
I love making Creme Brulee because it feels like a fancy treat that impresses everyone. The best part is that it only needs a few simple ingredients and the right steps to come out creamy and delicious. With a hint of orange flavor, this dessert will bring a sweet smile to anyone who tries it!
Method
Preheat the Oven
Begin by setting your oven to 320°F (160°C). This ensures that the oven is at the perfect temperature when you place your Crème Brûlée inside. Getting the heat right from the start is key to achieving that smooth custard texture. An oven thermometer can be helpful to confirm you’re at the exact temperature.
Whisk the Egg Mixture
In a medium bowl, whisk together the egg yolks, salt, and sugar. I like to whisk until the sugar has mostly dissolved and the mixture looks pale yellow. This step helps the yolks and sugar blend smoothly, which makes for a silky custard later on. Take your time here—if you rush, you might not get that even texture you’re aiming for.
Heat the Cream
Place your heavy cream into a saucepan along with a vanilla bean (or a teaspoon of vanilla extract) and a touch of orange extract. Warm this mixture over medium-high heat until it just begins to boil. You want to see small bubbles forming around the edges—this signals that the cream is hot enough. The vanilla and orange extracts will perfume the cream, giving your Crème Brûlée a delightful aroma.
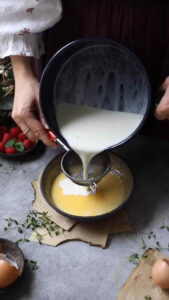
Combine Slowly
Once the cream begins to boil, remove it from the heat and let it rest for about 3-5 minutes. This quick pause allows the cream to cool slightly, which helps prevent the eggs from scrambling. Next, pour about ¼ cup of the hot cream into the egg mixture very slowly while whisking continuously. This gentle drizzle technique is crucial. If you add the hot cream too fast, the eggs might cook instantly, creating little lumps.
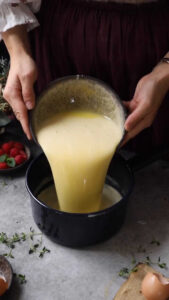
Finish the Mixture
Now that you’ve tempered the eggs, pour the combined egg and cream mixture back into the saucepan and stir gently. At this point, the custard base is nearly complete. Use a spoon to skim off any foam or bubbles that have formed on the surface. Removing this foam will help your Crème Brûlée set with a perfectly smooth top.
Fill Ramekins
Take your ramekins—either three 5-inch ones or four 6-ounce sizes—and place them on a sturdy baking sheet. Carefully divide the custard among the ramekins, making sure they’re filled as evenly as possible. You don’t want any drips on the edges if you can avoid it, because that can affect the final presentation.
Water Bath
The water bath, also known as a bain-marie, is a simple but essential step. Carefully pour very hot water into the baking sheet, around the ramekins, until it reaches about halfway up the sides. This water bath allows for gentle, even cooking. It keeps the edges of your custard from getting too hot too quickly, which could lead to a curdled or grainy texture. Be cautious when handling the tray—hot water can splash if you move too quickly.
Bake
Slide the baking sheet carefully into the preheated oven. If you’re using 5-inch ramekins, bake for approximately 25-27 minutes. For 6-ounce ramekins, allow 30-35 minutes. The key indicator is how the center looks: it should have a slight wobble when you gently tap the side of the ramekin. If it’s completely firm, you’ve likely overbaked. If it’s too runny, give it a bit more time but keep a close eye on it.
Cool
Once you’re satisfied with their jiggle, remove the ramekins from the oven and set them on a cooling rack at room temperature. This lets the custard settle and finish cooking through. After they’ve cooled, transfer them to the refrigerator for at least 3-4 hours, or ideally overnight. This chilling period is what truly sets the custard into a luxurious, creamy dessert.
Caramelize the Sugar
When you’re ready to serve, sprinkle 1-2 teaspoons of granulated sugar evenly over the top of each chilled Crème Brûlée. Using a kitchen torch, carefully heat the sugar until it melts into a golden-brown, glassy crust. Let the caramelized sugar cool for a couple of minutes so it can harden. Once it’s crisp, you can tap your spoon against it to break through the sweet shell and dive into the creamy goodness beneath.
Necessary Tools
- Ramekins: You’ll need 3 to 4 heat-safe ramekins (either 3 of 5-inch size or 4 of 6-ounce size).
- Mixing Bowls: One medium bowl for whisking the eggs, salt, and sugar.
- Saucepan: Medium-sized for heating the cream.
- Whisk or Spoon: For mixing the ingredients.
- Baking Sheet: To hold the ramekins in a water bath.
- Kitchen Torch: To caramelize the sugar on top (you could use your oven’s broiler, but the torch is more fun!).
- Measuring Cups and Spoons: To get the right amounts of each ingredient.

Crème Brûlée Recipe
Ingredients
- 5 medium egg yolks
- 1 pinch of salt
- ½ cup 100g granulated sugar
- 2½ cups 550ml heavy cream
- 1 vanilla bean or 1 teaspoon vanilla extract
- ¼ teaspoon orange extract or ½ teaspoon orange zest
- Extra granulated sugar for caramelizing on top
Instructions
- Preheat the Oven: Set your oven to 320°F (160°C).
- Whisk the Egg Mixture: In a medium bowl, whisk together the egg yolks, salt, and sugar.
- Heat the Cream: In a saucepan, add the heavy cream, vanilla bean (or extract), and orange extract. Bring this to a gentle boil over medium-high heat.
- Combine Slowly: Once the cream starts to boil, take it off the heat and let it sit for about 3-5 minutes. Then, very slowly pour a small amount (about ¼ cup) of this hot cream into the egg mixture while whisking continuously. This keeps the eggs from cooking too fast and turning lumpy.
- Finish the Mixture: Pour the egg-and-cream mixture back into the saucepan and stir gently. Use a spoon to skim off any foam on top.
- Fill Ramekins: Divide the mixture evenly among your ramekins.
- Water Bath: Place the ramekins on a baking sheet. Carefully pour very hot water into the baking sheet until it reaches about halfway up the sides of the ramekins. This water bath helps the Crème Brûlée cook gently and evenly.
- Bake: Put the baking sheet into the oven.
- If using 5-inch ramekins, bake for about 25-27 minutes.
- If using 6-ounce ramekins, bake for about 30-35 minutes.
- You’ll know they’re ready when the centers still wobble a bit if you tap the side.
- Cool: Take the ramekins out of the oven and let them cool at room temperature. Then, put them in the fridge for at least 3-4 hours or even overnight.
- Caramelize the Sugar: When you’re ready to serve, sprinkle 1-2 teaspoons of sugar on top of each chilled Crème Brûlée. Use your kitchen torch to melt and caramelize the sugar until it’s golden brown and crispy. Let them rest for 2-3 minutes before digging in.
Notes
- Slow Pouring: Always pour hot cream into the eggs very slowly to avoid scrambling them.
- Water Bath: Don’t skip the water bath! This is what keeps the dessert creamy and silky instead of turning lumpy.
- Gentle Baking: Keep an eye on your Crème Brûlée so it doesn’t overcook. If it sets completely in the oven, it might be stiff once cooled.


Serving Suggestions
- I love topping Crème Brûlée with fresh raspberries or strawberries for a pop of color.
- A sprig of mint can make each dish look extra special.
- Serve it alongside a hot cup of coffee or tea to balance the sweetness.
Fun Fact
Did you know that “Crème Brûlée” is French for “burnt cream”? The name comes from the crunchy, caramelized sugar layer on top that we “burn” with a torch or under the broiler!
Conclusion
I hope you enjoy making (and eating!) this homemade Orange Crème Brûlée as much as I do. The smooth custard, crunchy sugar topping, and gentle orange flavor are perfect for special occasions—or just because you want a tasty treat. Have fun creating this sweet masterpiece and impressing all your friends and family!