
There’s something so comforting about a creamy risotto, especially when paired with tender, flaky salmon. This Salmon Risotto recipe is an elegant yet easy dish that’s perfect for a cozy dinner or a special occasion. Packed with the rich flavors of Parmesan, sun-dried tomatoes, and fresh dill, it’s a meal that feels fancy but is simple enough for a weeknight. Let’s get started!
Method
Cook the Salmon
Begin by seasoning the salmon fillets evenly with Old Bay seasoning and a sprinkle of parsley. This enhances the natural flavor of the fish while adding a subtle herbal note. If you’re using an air fryer, preheat it to 190°C (375°F) and cook the fillets for 10 minutes, ensuring they turn out perfectly cooked with a crispy exterior and tender, flaky inside. Alternatively, if you prefer using an oven, bake the seasoned fillets at the same temperature for 12 to 15 minutes, or until the salmon flakes easily with a fork. Set the cooked salmon aside while you prepare the risotto.
Start the Risotto
In a large frying pan or skillet, heat a small amount of oil over medium heat. Add the finely diced onion and minced garlic, cooking gently until both become soft and translucent. Stir occasionally to prevent them from browning too quickly, as the goal is to create a delicate, aromatic base that will infuse the risotto with flavor.
Add the Rice and Tomatoes
Once the onions and garlic are softened, stir in the risotto rice. Coat the grains thoroughly with the onion mixture, allowing the rice to toast lightly for about a minute—this process helps the rice absorb flavors and adds depth to the overall dish. Incorporate most of the chopped sun-dried tomatoes at this stage, reserving a few for garnish later. The tomatoes contribute a tangy sweetness that complements the creamy risotto.
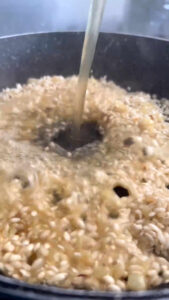
Add Stock Gradually
The key to a perfect risotto is patience. Using a ladle, add warm vegetable or chicken stock to the rice one scoop at a time. Stir continuously, allowing the rice to absorb the liquid before adding more. This gradual addition of stock releases the rice’s starches, creating the creamy texture risotto is known for. Continue this process until the rice is tender yet still slightly al dente, which should take approximately 20 minutes.
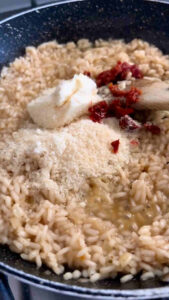
Finish the Risotto
Once the rice has reached the desired consistency, stir in the grated Parmesan cheese, fresh chopped dill, and peas if you’re including them. The cheese will melt into the risotto, enriching its creaminess, while the dill adds a fresh, herby brightness. If using peas, cook them just until they’re heated through, preserving their vibrant color and slight bite.
Assemble and Serve
To bring everything together, gently flake the cooked salmon into large, tender chunks. Carefully place the salmon on top of the risotto, ensuring you don’t break up the fish too much, as its texture is part of the dish’s appeal. Garnish with the reserved sun-dried tomatoes for a pop of color and added flavor. Serve the risotto alongside steamed broccoli for a balanced, wholesome meal.

Salmon Risotto Recipe
Equipment
- Air fryer or oven
- Large frying pan or skillet
- Ladle (for adding stock to the risotto)
- Wooden spoon
Ingredients
- For the Salmon:
- 2 salmon fillets
- 1 tsp Old Bay seasoning
- 1 tsp parsley
- For the Risotto:
- 150 g risotto rice
- 1 small onion diced
- 2 garlic cloves minced
- 1 liter stock vegetable or chicken
- 30 g sun-dried tomatoes save some for garnish
- 30 g Parmesan grated
- 1 tbsp chopped dill
- Optional: 50g peas
- Optional Side:
- Steamed broccoli
Instructions
- Step 1: Cook the Salmon.
- Season the salmon fillets evenly with Old Bay seasoning and parsley. Place them in an air fryer and cook at 190°C (375°F) for 10 minutes. If you’re using an oven, bake at the same temperature for 12-15 minutes until cooked through.
- Step 2: Start the Risotto.
- In a large pan, gently fry the diced onion and minced garlic over medium heat until softened.
- Step 3: Add the Rice and Tomatoes.
- Stir in the risotto rice and cook for about a minute to coat it in the onion mixture. Add most of the sun-dried tomatoes, saving a few for garnish.
- Step 4: Add Stock Gradually.
- Using a ladle, add the stock to the risotto one scoop at a time. Wait until the liquid is absorbed before adding more. Continue this process until the rice is creamy and cooked through, which will take about 20 minutes.
- Step 5: Finish the Risotto.
- Stir in the Parmesan, chopped dill, and peas (if using). Mix well until the cheese has melted and the peas are warmed through.
- Step 6: Assemble and Serve.
- Flake the cooked salmon into chunks and place it on top of the risotto. Garnish with the reserved sun-dried tomatoes and serve with steamed broccoli on the side for a complete meal.
Notes
- Stock Temperature: Use warm stock for the risotto to ensure even cooking.
- Avoid Overcooking: Keep an eye on the risotto to prevent it from becoming mushy.
- Flake Gently: When flaking the salmon, be gentle to preserve the texture of the fish.


Serving Suggestions
- Serve with a crisp green salad for a lighter option.
- Pair with a glass of chilled white wine, like Sauvignon Blanc or Pinot Grigio.
- Add a drizzle of lemon juice on the salmon for a zesty kick.
Fun Fact
Did you know that risotto is a northern Italian dish traditionally made by slowly cooking rice with broth? The creamy texture comes from the starch in the rice, so there’s no need to add cream!
Conclusion
This Salmon Risotto is the perfect blend of creamy, savory, and fresh flavors. Whether you’re treating yourself to a quiet evening or impressing guests, it’s a recipe that delivers every time. Try it out and let me know how you customize it—extra Parmesan on top is always a win! Happy cooking! 🥂🐟🍚